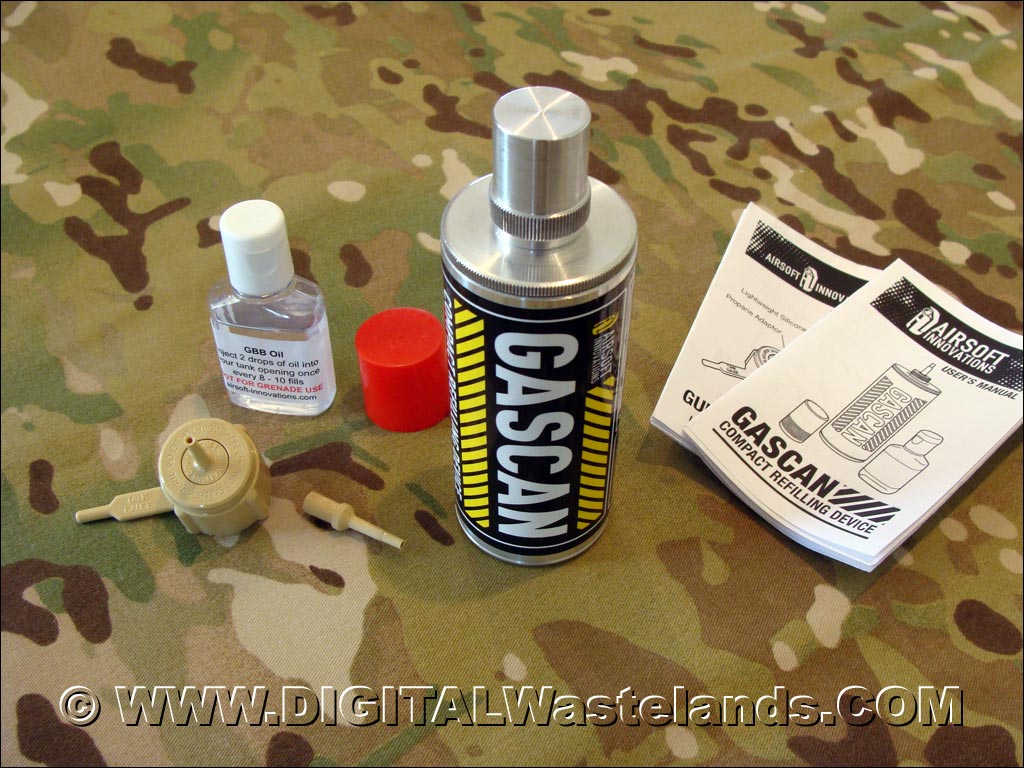
The Airsoft Innovations – GasCan Compact Filling Device was designed to carry propane from a larger tank, in a much more compact device, so you can refill in field.
Compact, light weight.
Height 5.25” by Diameter 1.75”, Weight 160 g
Store 10 Tornado, 5 TM Hicapa mag, 12 TM 1911 mag fills of propane
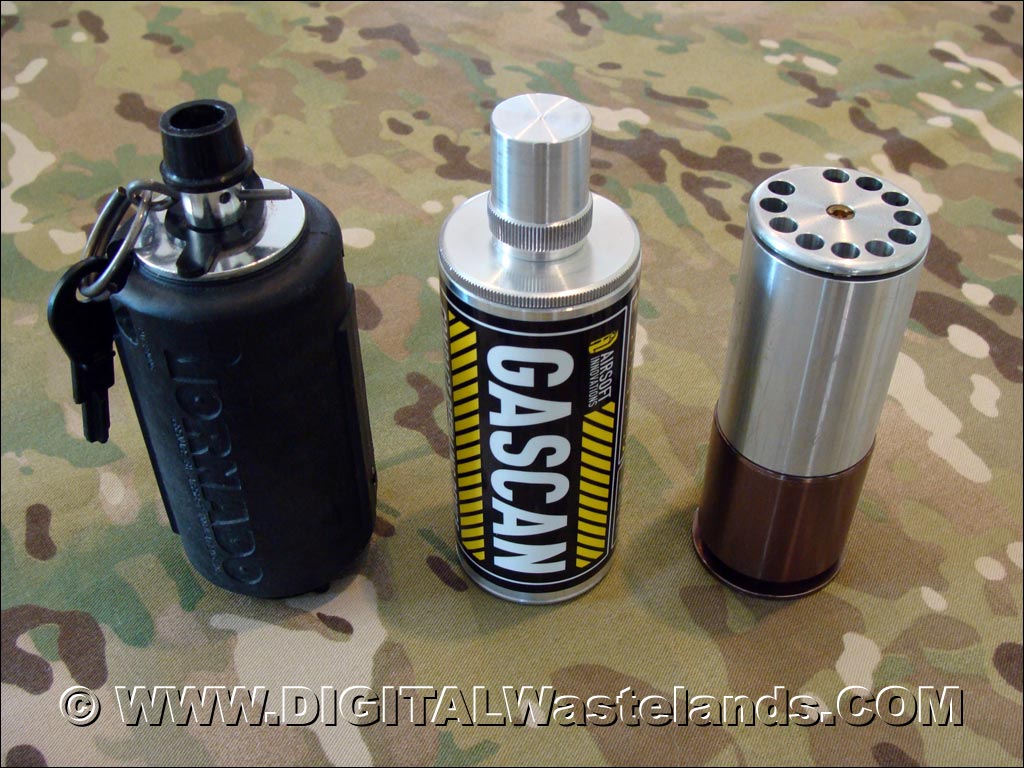
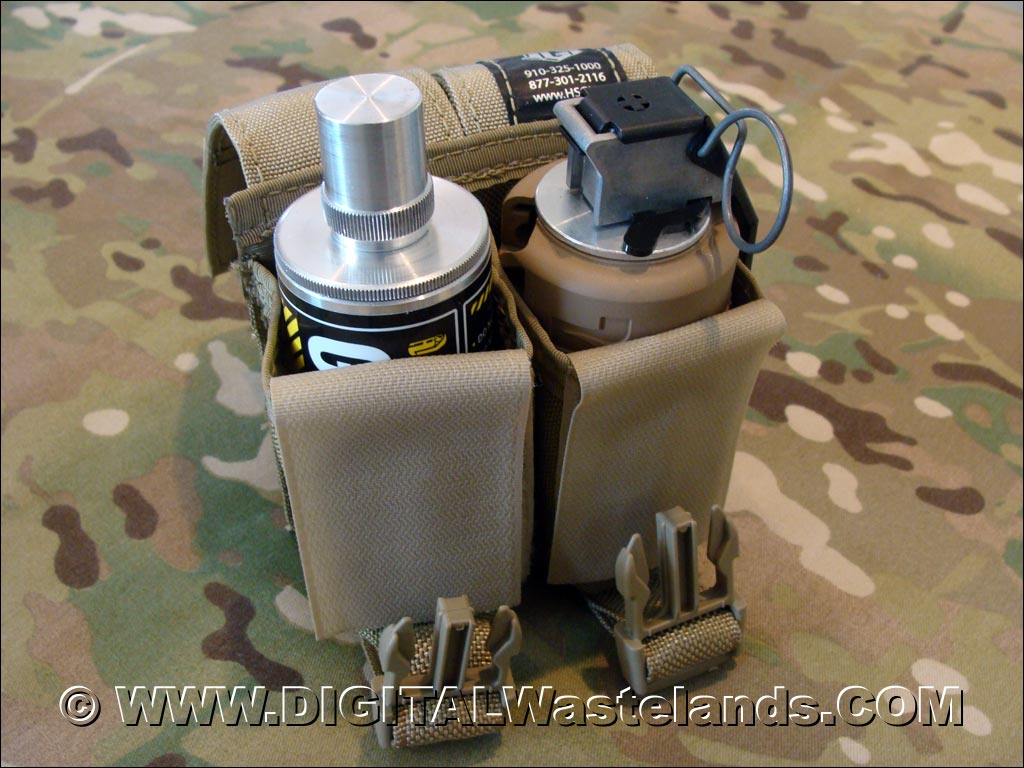
1 fits in a flashbang pouch, 2 fit in an M4 double mag pouch. Minimum real estate on your gear
NC machined metal parts with Relief Valve
High strength pressure vessel, fully reusable, keeps your GBB topped up
Removable Top Cap
Easiest and most efficient way to lube your mags
Comes with GunGas Oil
This is a very straight forward device to use and well made for durability. Let’s you add silicon oil to the propane and has easy to follow ratios depending on what devices you refill.
In a nut shell My reviews tend to be a bit lengthy, so let me start by simply stating that these Airsoft Innovations Impact Grenades are AWESOME. That’s pretty much what you should take away from this review. These Impact Grenades really do deliver exactly as advertised … and more importantly, they do so incredibly consistently. Now, onto the review …
The anticipation: I was pretty excited when I first read the description of the Airsoft Innovations Impact Grenade. On paper, it seemed to embody everything I wanted out of a BB hand grenade. Then the videos came out showcasing its incredible capabilities and that continued to fuel my excitement. What an awesome concept … but would it really deliver as promised? I soon found out that it did, and it accomplished the task exceptionally well.
Airsoft Innovations Promotional YouTube Video
Packaging: Each Impact Grenade kit comes in a brown cardboard box with illustrations showing the device contained therein. Actually, it’s essentially the same packaging as was used with the Timer Grenades and therefore the grenade on the box is a timer grenade and not an Impact grenade, but that doesn’t bother me at all. They added a bright orange sticker to the closure of the box to denote it as an Impact Grenade. I appreciate that they took the time to take a little pride in making some interesting looking boxes. I like the packaging. In my opinion it’s simple and tasteful. The brown cardboard box was a conscious decision by AI to put as little cost in packaging as possible. It is made primarily from recycled material with vegetable based ink because it was expected to be discarded in the first 1% of the product lifecycle. They wanted to avoid using a plastic bag, but had to in the end otherwise the small parts could fall through the box flaps or front window. They went for broke on packaging graphical design because it looks cool and it’s a one time cost which amortizes fast and has no incremental cost.
Each grenade comes sealed in a plastic bag, with the trigger components in a separate bag, and the black safety base cap unscrewed from the unit. AI even included a bottle of their own Grenade lubricant oil (specifically formulated for their grenades) that will last you for approximately 150 detonations. A couple of my oil bottles had leaked a little bit and because they used a small polyethylene press to close type bag to contain it, some of the oil leaked out onto the rest of the items in the box. Nothing tragic of course as although the oil goes a long way, very little of it was actually spilled, and the rest of the items were in their own fully sealed poly bags. That happened with two or three of my four grenades, and I’d suggest to AI having the oil bottles placed in a fully sealed poly bag rather than the small zip lock type bags to ensure zero spillage during transit.
Picture of the packaging:
Here’s what comes in the box:
Unlike most airsoft products we see out there with poorly written English Manuals (and that’s if you get English at all), the AI manual is written exceptionally well and obviously by someone who speaks English as a first language. When asked about it AI had this to say: “We try to make good looking manuals on low cost materials instead of poorly designed manuals on expensive materials. Cheap well drawn and written manuals are worth keeping. Expensive chingrish starts out as garbage.” And I wholeheartedly agree. The manual is easy to follow and very thorough. The only minor drawback was that since some of my AI Grenade Oil had leaked, the front and back pages of my manual had become semi see-through. Didn’t make reading the manual impossible but (IMO) could have been avoided if a full seal poly bag was used with the Grenade Oil Bottles.
Appearance: Very similar in aesthetics to AI‘s Timer Grenade, this AI Impact Grenade has a hard plastic outer shell with some metal and plastic components throughout. The grenade is generally cylindrical in shape, however it does have ridges and flat sides along its length. The rectangular sides of the grenade were originally intended to provide a tactile feel so users could orient a grenade in their hands by feel before pulling the pin on a timer grenade. Early user testing of the timer prototypes showed that users often bent their pins when yanking on them crookedly. With a little training, users could feel the rectangles and know which direction to haul on a pin. Real grenades have a spoon which are also used to orient the grenade in the throwers hand before pulling the pin. Spoon against the palm is the proper orientation for a real frag. The outer shell design AI chose assisted users in pulling a 3s pin inline with the rectangles for the AI Tornado. Obviously this is less important with the Impact grenade since the pull pin is extracted inline with the grenade body, but it would have been too costly to create entirely new molds for the Impact grenades.
The top of the grenade is metal, with a rubberized cap. The rubber tube cap bit at the top of the grenade acts as a bumper to cushion the potential blow to a player’s head or body. Getting a turned hunk of aluminum in the head would hurt so AI put a bumper on that end. Unlike the Timer Grenades which have a side inserted pull pin, the Impact Grenade has a top inserted pull pin which is necessary for the unique trigger mechanism AI have devised. This pull pin is perhaps the only element on the Impact Grenade that I’m not crazy about. The top installed pull pin adds considerable height to the device that makes it difficult to use with most flashbang pouches. I’d personally prefer a pin with a loose metal ring on the end similar to those used by the timer grenades. I understand why AI shaped the pin the way it is because it has a catch incorporated into the pin that hooks into the top cap reducing the likelihood that the pin will get accidentally pulled out (you have to consciously squeeze the pin on the sides before pulling it out). Which is a very valid concern since the first thing your hand will most likely come into contact when removing the grenade from a pouch is the top pin … it would suck if you reached in for a grenade and only came out with the pin … *gulp*. Still, I’m left wondering if there’s another pin alternative.
The AI Impact Grenades currently come in two colors, Black and Blaze Red/Orange. As much as I like the tactical look of the black Impact Grenades, back when I bought their Timer Grenades I learned that grenades colored almost completely black can be a pain in the butt to find later on after you’ve thrown it. My solution with the Black Timer Grenades was to tie a colorful red length of flagging tape to the rubber bumper at the top of the grenade essentially as if it were a tape streamer. This helped a great deal when trying to recover the timer grenades later on. Now that I have a choice, I must say that I can forgo the “tactical” desire to have black grenades and would much rather have a bright colored grenade to expedite grenade recovery. I also suggested to AI that it might be a good idea to have bright blue and bright yellow shelled grenades available too so that you could conceivably have certain teams only using certain colored grenades. That might be something that will happen down the road, but for now, it’s black and red Impact Grenades, and that’s fine by me.
Picture of a BLACK and RED Impact Grenade side by side:
Loading: The process is similar to the timer grenades. Using whatever BB loading tool you prefer to use (I like Tokyo Marui STANAG style BB Loaders for all my loading needs), you load 100 BBs into either BB port at the top of the grenade (200 BBs total). The grenade’s plastic outer shell FORMS the spiral passages which the bbs are stored in and are propelled out of. They are solid shapes which join to form two spiral passages around the cylindrical valve body.
Resetting the detonation trigger: The main difference between the AI impact grenades and the AI timer grenades is the trigger assembly used in either one. The detonation trigger setup that the Impact Grenade uses is a really interesting set of parts. It’s clear this seemingly random collection of parts are the shape and size and weight that they are such that that specific set of components yields a consistent trigger mechanism. For example, AI clearly made a conscious decision to use a thin pin AND a fat pin and not just two pins of the same size. Obviously extensive time and experimentation was taken to produce a consistent triggering method. While it may look like a complicated and finicky design, when you actually get to using the device you realize it’s as simple as stacking 4 different pieces of metal in a certain order. It takes a mechanical engineer/designer to invent such a device, but it only takes a trained chimp to actually use it.
While resetting the grenade over and over again I was concerned that the trigger components are somewhat small and could be easily lost if you’re not careful (it’d be a bit nerve racking to reassemble the unit in the field). I haven’t lost any parts yet … but I can see how it’s certainly not difficult to do so. Thankfully there will be spares of those available for purchase soon.
The actual process of resetting the detonation trigger isn’t all that complicated once you’ve done it a few times.
Unscrew and remove the bottom black base cap, aka the valve cover.
Unscrew and remove the top cap that contains the trigger components (Careful! They will be loose within the body of the grenade). Set the trigger components on the side, perhaps in a container so you don’t loose them.
Invert the body of the grenade, and add a couple drops of AI‘s Grenade Oil through the opening between the shuttle and valve body. Try to drip oil directly into the metal cylindrical gas chamber. Adhering to the lubrication scheme is important for consistent grenade operation. Because the grenade dumps it’s entire gas charge in one blast, it aerosolizes the lubricant rapidly and hoses it out the bb passages. The AI manual indicates that you only need to lubricate the grenade every 5 detonations to maintain consistent operation. Personally, I lube mine much more frequently than that (usually every two detonations) because I’m a bit paranoid. Don’t worry if you put too much oil into the grenade by accident, as you can’t over lube it. This grenade loves lube.
Turn the grenade body correct side up, and push the inner plastic shuttle all the back in and down towards the base of the grenade.
Insert the pin into the top cap and make sure it hooks in securely.
Now invert the top cap so that you can see the stem of the pin in the top cap.
Slide on the trigger components onto the pin in the following order: fat pin, semi-circular block, washer, thin pin. Each trigger component’s orientation isn’t important. If it goes onto the pin, you’re good to go.
Screw the top cap which now has the pin and trigger components in place back onto the grenade body. You may find it easier to do this with the top cap inverted and by screwing the body onto the top cap (screwing the top cap down onto the body will probably have all the trigger components slide off the pin).
Invert the grenade and inject propane gas into the fill valve at the bottom of the shuttle. You won’t need to fill it for long, 3 to 4 seconds at most. I’ve noticed that grenades can slightly hiss immediately after filling yet exhibit no leaks under an immersion test. AI immerse all the grenades in water to make leaks visible. When asked about this, AI hypothesized that this could be because the propane charge could be boiling away inside the grenade while it warms up. There should be no gradual leaks in your grenades. I’ve blown up grenades days after filling.
Screw the valve cover back onto the base of the grenade.
I’ve run through the set up process of the grenades many times now throughout my testing. If I haven’t used the grenade in a while the only step I’m sometimes not 100% clear on is the order in which the trigger components slide onto the pin. If I’m not sure, I do find myself taking a quick glance at the included manual to see the component stack order. I’ve considered marking on the grenade how the trigger components are supposed to go on the pin. Alternatively, I guess I could use a thin tipped permanent marker and right a number on each part denoting their order (numbered 1 through 4). I’m just not sure how long that will last with the parts loosely rubbing against one another for a duration after detonation. It’ll take some experimenting.
This would be the order of the trigger components when stacked onto the pull pin:
Note, the above image is purely for visualization purposes of the stack order. Normally you’d insert the pin into the top cap first then add the trigger components, as seen in the following images.
When the pin is inserted into the top cap, and the trigger components are stacked, it’ll look like this:
Making the grenade “live”: The final step to making the Impact Grenade live is screwing on the black base cap that AI refers to as the valve cover. This is a rather ingenious fail safe component AI designed into the grenades. That base cap reroutes the releasing gases into the holes at the base of the grenade allowing the gas to travel up and through the spiral passages which stores the BBs and which the BBs are propelled out of. Detonating the grenade without the base cap present on the bottom of the grenade, disables the gas rerouting from pushing the BBs out and instead, all the gas is expelled out of the grenade’s base and any loaded BBs are not shot out. AI states that whenever entering a safe zone, that base cap should be removed to prevent accidental detonations from causing harm.
Something I noticed: while screwing the bottom black cap onto the grenade as the final step of arming it, I felt a small pop … which AI suspected is most likely the valve assembly sliding in the shells a bit due to a small amount of play, so it pops up against the valve cover when you crank it down against the shells. There’s a bit of play in the peg which holds the valve assembly in the shell halves. It happened every time I armed the grenade, and never had any negative effect on the performance of the grenade. But it’s worth mentioning so you don’t think that’s something that shouldn’t be happening. It’s fine and not something to be concerned about.
Triggering the detonation: Two simple steps, (1) pull the pin, and (2) toss the grenade. Pulling the pin allows the stack of trigger components to collapse when sufficient force is imposed on the unit from being tossed and impacting with a hard surface. The grenade will NOT detonate when the pin is in place (because the trigger components are immobilized by the pin), and it will NOT detonate when the pin IS pulled and the grenade is being rigorously shaken by a person even under the most active of circumstances. When you think about what is being asked of these trigger components, you realize the tight tolerances and the intelligence behind using this specific set of parts in order to guarantee a successful detonation each and every time, when and how you want it. It’s no small feat.
In order for AI to ensure that the device could never detonate with the combination of the pin removed and being shaken aggressively as much as humanly possible, extensive testing with different component setups was conducted to find just the right balance and the right set of parts. The first obvious hurdle of not having the unit trigger when shaken like a spray can or a baton when you’re running, was overcome when understanding that the human motions of shaking an object still require that person to slow down almost imperceptibly in order to change directions. This meant that AI had to figure out exactly how much force it takes to unbalance the trigger component stack when dropped/impacted against a hard surface versus the rigorous motions of the human body. And they succeeded. As hard as I’ve tried, I’ve never set off the grenade by shaking it (if it were a baby … I’d go to jail).
I found the same level of consistency when dropping it on a hard surface. As AI states, it literally only takes a 1″ drop onto a hard surface to detonate the grenade. And more importantly, it has never failed to detonate from impact even once throughout all the testing and demonstrations I’ve done (which at this point are quite a lot). Every, single, time.
On hard surfaces AI guarantees the device to detonate, but cautioned that softer terrain such as grass or desert areas, may require slightly more height when tossed. We found that while the device may not detonate when dropped onto grass or desert when it had a 1″ drop, it never had issue with any of the realistic tosses we gave it (even a light toss three feet away starting at 2 feet above ground). I guess you might have difficultly setting it off if thrown into sand, but I have yet to use it in sand anyway even in the California Desert we predominantly play in.
Effectiveness: I was a little nervous … mostly because I expected so much from this Impact Grenade. The first 5 or 6 times I used it, I kept expecting the device to eventually fail to detonate. It never did. It just kept on working. Its reliability is pretty shocking actually. And when it sprays the BB’s it has a surprisingly good coverage. Tossing the grenade 7 to 8 feet away from myself I generally do get hit by a couple BBs which is pretty good as it tries to get maximum coverage in 360 degrees. A well aimed grenade toss near an enemy is pretty much guaranteed to ensure a kill. You’ve probably all seen AI‘s demo video of them throwing the grenades onto the floor and against a wall. Balanced on a door knob against the door frame so that when the door is opened, the grenade drops killing the person that enters. These all work exactly as advertised showcasing how wonderful this product is as both a grenade and as a booby trap device. I often find myself day dreaming during meetings at work about new and devious ways to use the Impact Grenade. It’s really that fun.
Carrying options: You’ve got a lot of choices here … In your pocket: Though not exactly “Tactical”, these could be carried in your pocket thanks to their size. Not ideal though. Smoke Grenade Pouches: They also fit in smoke grenade pouches, though you may find that they’re somewhat smaller than most real smoke grenades making them fit loosely in some dedicated smoke grenade pouches. HSGI (HighSpeedGearInc) occasionally does custom gear, so I had them make a set of double smoke grenade pouches with their shock cord tightening system so that no matter how much smaller the Tornado is from a regular smoke grenade, the shock cord can be cinched tighter to keep it secure. Flashbang pouches: I have noticed they fit perfectly in most flashbang pouches, however due to the upright pull ring, some flashbang pouches might not be able to close (though timer grenades are probably gonna fit perfectly in them). You could probably put the impact grenade without the pull ring in the flashbang pouch, I’m just not that brave and I doubt my teammates would appreciate me randomly martyrdom myself whenever I bump into something. I could not use the pouch flaps, but with nothing to hold the grenade in place that would increase the chances of the unit popping out during rigorous activity, like running. M16 pouches: Another option that I personally quite like is using M16 double (or single) mag pouches which have top flaps. I like those because (1) I usually have plenty of spares lying around, (2) if you don’t have any spares, they’re common and easy to buy, (3) if the pouch has elastic around it (like most Eagle Industries M4 pouches have) they’re held in relatively well, and (4) the flap is great as it protects the pull pin from getting accidently hooked on something and pulled out and is an extra level of security in keeping the Impact Grenade in the pouch during strenuous activity. Blue Force Gear 10 Speed Pouches: I quite like the 10 speed pouches by Blue Force Gear. These pouches are single mag pouches that are designed to collapse flat when empty thanks to the elastic material used. They hold the grenade very snugly, but leave the pull pin unprotected (which may or may not be okay for you). Utility pouches: Kind of a no brainer, utility pouches come in all shapes and sizes. You probably have a spare lying around somewhere waiting to be used or one on your rig (or your buddy’s rig … hey, I don’t judge) that needs to be re-purposed. I’ve had surprisingly good results with the Emdom Small Utili-Shingle Stackable Pocket which perfectly holds two Impact Grenades with their pins in place.
Different carrying options. HSGI Custom Smoke Pouches (with flaps open and closed):
Eagle Double M4 Pouch (left image), and a BlueForceGear 10 Speed pouch (right image):
Emdom USA Small Utility Pouch:
How to mark your grenade as your own: Before using your grenades in game I would strongly recommend marking your name on the grenades to help avoid confusion later on for whatever reason. Permanent Markers: The simplest solution would be to use a sharpie and mark it on the side of the plastic shell. Sharpie make some great silver ink sharpies that work great especially on dark surfaces and would be perfect on the black shelled grenades. And pretty much any sharpie would be suitable for the red grenades. Label Makers: I quite like label makers by “Brother” and they make a variety of different types of clear laminated labels with black or white text. These are great for giving any of your kit a more professional look … that said, it’s probably not as permanent as a Sharpie, so it does depend on how much you trust your fellow player to give you back your property. Duct tape with your name Sharpied on it: Pretty self explanatory. And like the label maker, not the most full proof permanent marking solution, but it’ll do in a pinch. If you go this route, I recommend using Gorilla Tape. That stuff is TOUGH!
Picture of an Impact Grenade marked with a FICTIONAL player and team name using a label maker tape:
You can also make a label that shows the correct stacking procedure for the trigger components:
Price: The MSRP for the Airsoft Innovations Impact Grenades is $99.95. Not cheap, no. Then again, I truly feel that in this case, you get what you pay for. Spare trigger components will be available soon. And the estimated MSRP will be 5 pull pins for $8.95, and the Trigger components for $14.95. Grenade Oil is available separately (though each grenade comes with enough grenade oil for 150 detonations) at $4.95 per bottle. The Impact Grenades are also available in sets of 3 called the Grenadier’s Three Pack for $275, and 10 packs aka, A Big Bangin’ Bucket o’ Bombs, for $899.99. The cool thing about the 3 and 10 packs is that aside from saving some money (with the 10 pack, the unit cost dramatically drops from $99.95 per grenade to $89.99 per grenade), you also get some spare items and the ability to mix and match grenade types as well as colors.
As a side note, I suggested to AI to consider including a spare set of trigger components with each grenade purchase or at least have the components for sale separately. The trigger components (except for the half circle offset disc) are small and very easy to misplace. And as soon as you lose ONE of the four trigger components, your grenade is rendered unusable until you get spare sets. Also, I told them I’m not crazy about the $14.95 price point for the full set of replacement trigger components. I have yet to lose any of the large offset discs, but I have lost a couple of the small stems and slide discs. Repeatedly buying entire sets of all four components to replace just one or two components is going to get costly very fast. I suggested to AI that they consider selling sets of the the smaller items. I was glad to hear their response on this matter: “I am making plans to insource production of most of the trigger bits at which point we can offer them as spare parts. I think I’ll make them available individually and as a full set on our site and at our retail partners. It might make sense to keep a full spare set on hand and purchase individual bits as they are replaced so a full spare set can always be had at hand.”
Future developments:Impact Sound Grenade kits? At a lot of the more recent events I’ve been playing, it’s been very apparent that there’s a consumer need for loud BANG sound grenades. This is especially true if you play in urban environments with room breaching. There are products on the market that function as sound grenades by other manufacturers, however lots of players have discovered that they’re not 100% consistent in terms of reliability and since they’re all timer dependent you’re often left wondering when … and IF, they’re going to go off. Having been somewhat familiar with AI‘s previous “Distraction Device kits” that they designed for their timer grenades, I immediately asked if those kits would work with the Impact grenades. To my dismay, they reported back that the timer distraction device kits would not work with the Impact grenades as the internal designs are slightly different between the two grenade types. After some discussion, AI decided to fabricate an Impact Grenade distraction device kit prototype for me to test out. And the results are VERY good. AI‘s initial impression is that this Distraction Device cap isn’t quite as loud as their previous kit, but it seems to be a little more reliable. AI found that the impact grenade discharges gas so suddenly that a closure ring is not necessary. The bottom valve cover AI provided is modified from a regular valve cover (which can no longer be used for frag grenades). The setup process is similar to the timer grenades: You simply place a blowout disc (a circular mylar sticker) on the inside face of the modified valve cover. The rest of the setup process is the same as before (except you obviously don’t need to load the grenade with BBs, and even if you did the BBs wouldn’t be fired out). When needed, you toss the grenade and upon impacting a hard surface all the gas is trying to escape through the valve cover and builds considerable pressure behind the blowout disc. Once sufficient pressure is achieved, the blowout disc is ruptured creating a very loud audible BANG. Based on the timer grenade version who’s sound intensity emitted at 3 feet range is about 119dB, 112dB, 110.9dB (direct, side, away respectively), it’ll probably be slightly less with Impact Grenade version. Nothing deafening, but certainly enough to shock the senses of someone on the receiving end perhaps enough to give you a tactical edge during room clearing. It is extremely effective, and in some games I attend, sound emitting grenades are treated as if they are fragmentation grenades and anyone within a 15 foot radius and not behind hard cover is considered KIA. I can’t wait to see these DD kits for the impact grenade go into production. The price will probably be similar to the Timer Grenade’s DD kits at $14.95 for a DD specific valve cap with 50 individual blowout discs and additional sets of 50 blowout discs available at $4.95 per set. The conversion to distraction/sound grenade is completely reversible and you can swap back and forth between BB fragmentation and DD configuration in about 30 seconds. The fact that you no longer need a closure/burst ring actually makes the setup process easier and quicker.
Picture of an Impact Grenade’s prototype DD kit (on the left a standard valve cover and its rubber plug, on the right a modified valve cover for the Impact Grenade DD Kit):
In Summary: Pros:
Consistent detonation
Good fragmentation coverage
Good weight
Good build quality
Will have a Distraction Device Kit coming out
Spare parts available
Customer support
Cons:
Not cheap (but you get what you pay for)
Fiddly trigger parts are small and easily lost and not cheap to replace
Taller than most Flashbangs and therefore can’t be enclosed in standard flashbang pouches
Conclusion: This product really delivers on the more important points that most people need from it. With the pin removed it won’t detonate until it hits a hard surface so you’re relatively safe to handle it with the knowledge it won’t go off so long as you handle it appropriately. It has safety measures throughout the design and it’s simple to setup once you familiarize yourself with the process. Most importantly, the Impact Grenade detonates every single time without fail (in my testing), in a predictable manner and is extremely effective in spraying an area in BB “shrapnel” for incredible multi-kill opportunities. This will be a permanent accessory for my rig. Two thumbs up! 🙂
{simplegrade:4} Manufacturer: Airsoft Innovations Type: Grenade and Accessories
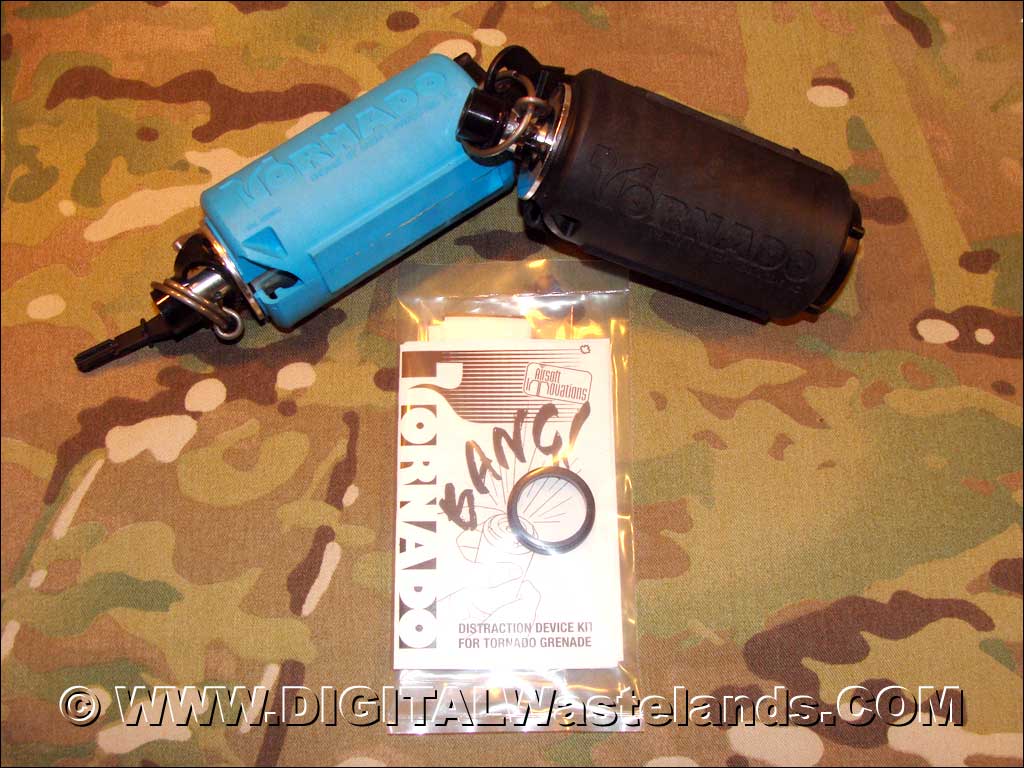
Airsoft Innovations – Tornado Grenades and Distraction Device Kit
Airsoft Innovations – Tornado Grenade have been out in the market for a while and there are already a few good reviews on them. Rather then regurgitate those reviews please click on 1 of my favorites, made by the SCAAR guys in Austria:
SCAAR – AI Tornado Video Review
I will confirm what they and others have reported on.
Pros
Durable.
Reusable.
Few external parts to lose.
Consistent bb delivery.
Can use higher pressure gasses.
Easy to load BB’s.
Cons
Gas pressure based timer is ambient temperature sensitive
Bottom cap can be cross threaded if not carefully screwed on
Airsoft Innovations – Tornado Grenades and Distraction Device Kit
I recently purchased the AI Distraction Device Kit. This turns your bb hurling Tornado grenade into a LOUD sound distraction device. It’s very simple to install and is a completely reversible process. It is also ambient temperature dependent so if the weather is cold, it may not have enough force to burst the mylar "popper" stickers.
Airsoft Innovations – Tornado Grenades and Distraction Device Kit
Airsoft Innovations – Distraction Device Kit Installation Video
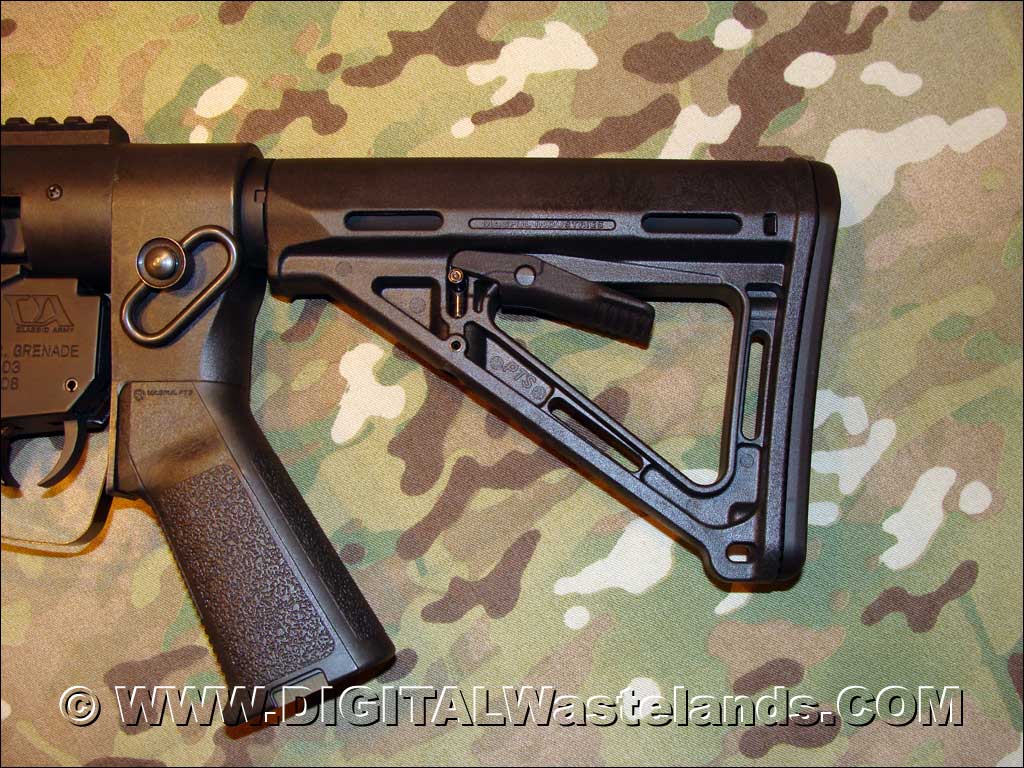
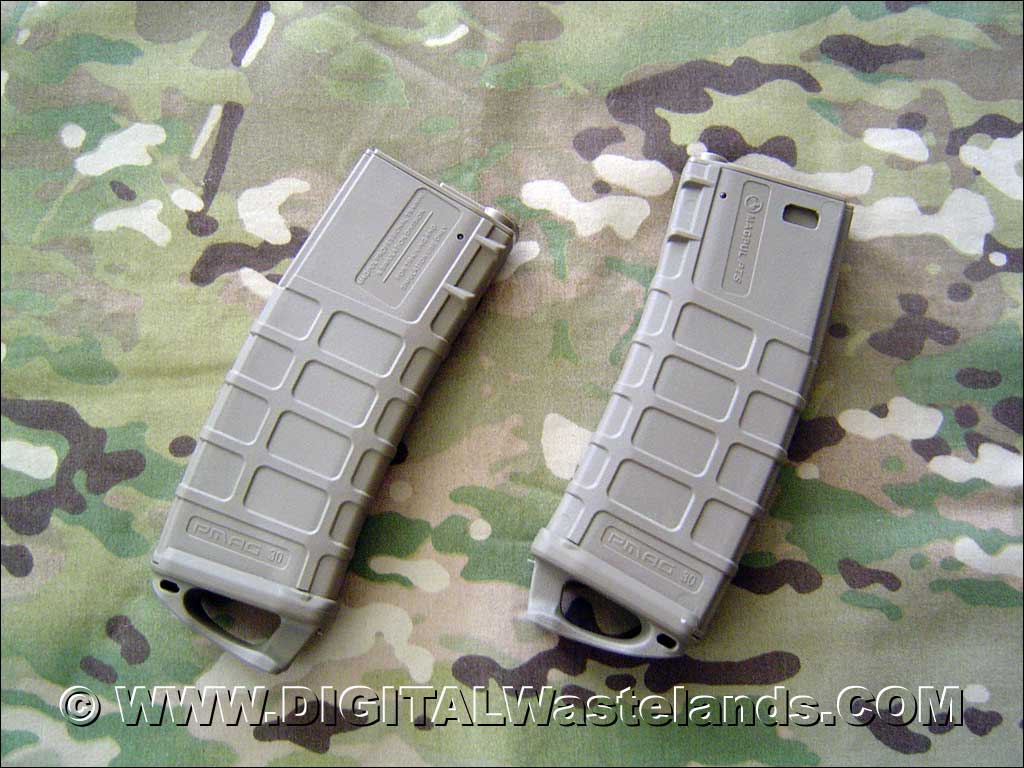
The Magpul PTS – PMAG is a 120 round midcap magazine, modeled after Magpul’s 30 round PMAG for Armalite style rifles.
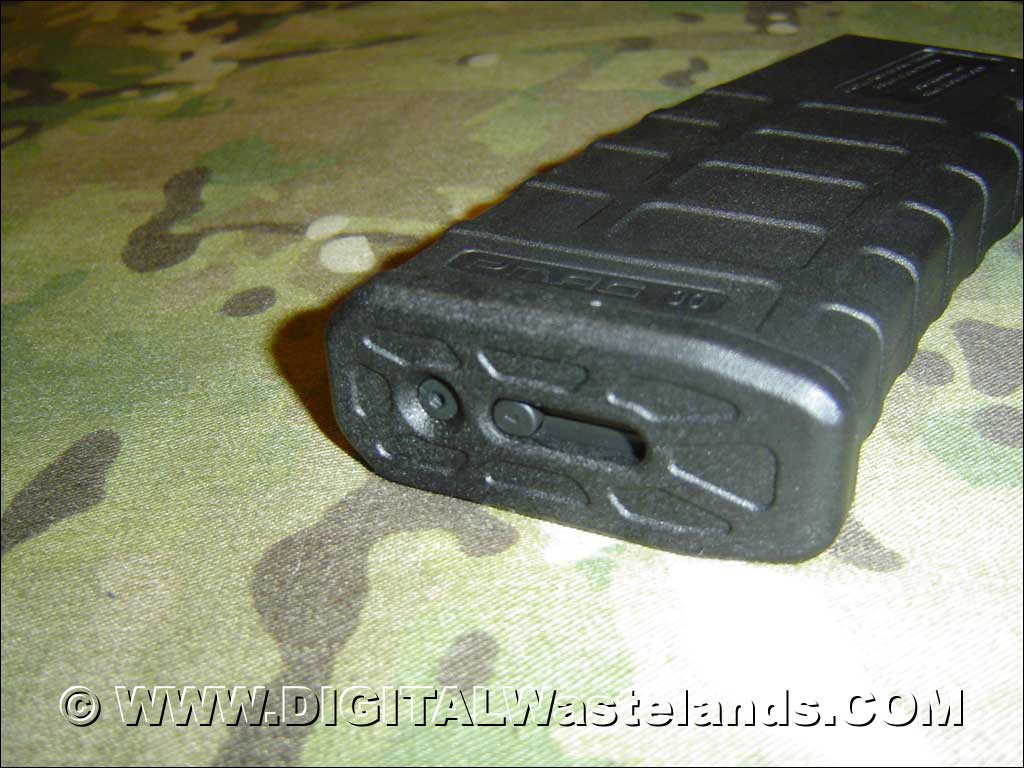
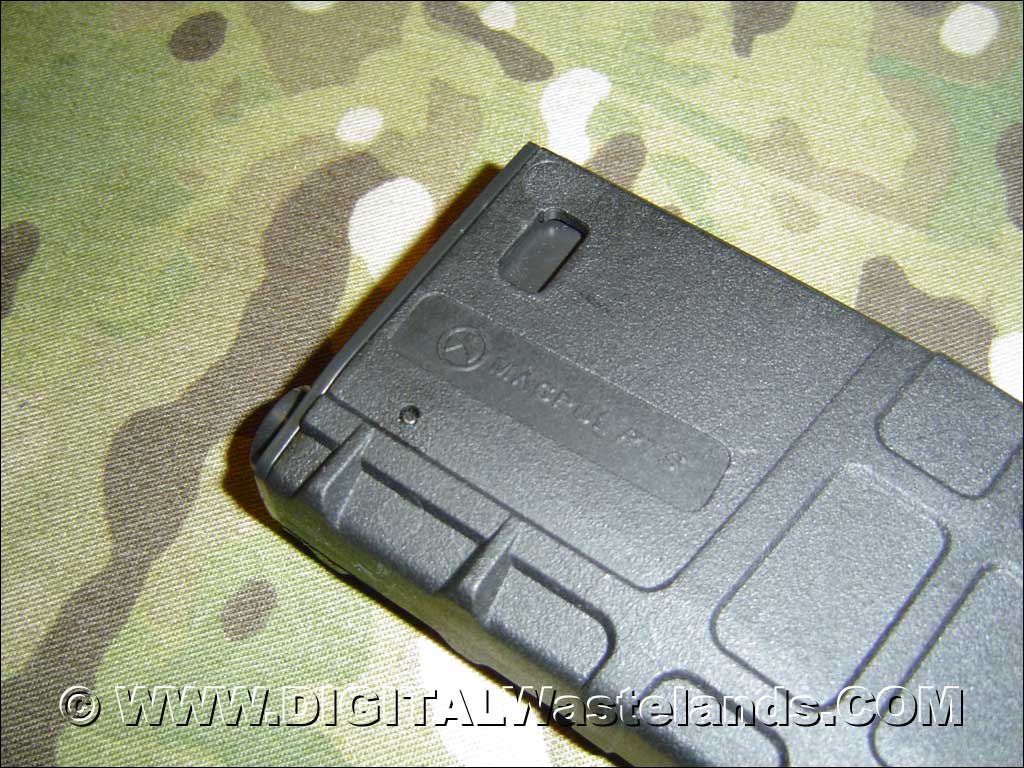
Magpul PTS – PMAG Bottom Plate
The PMAG has an allen screw as well as a spring loaded button, which keeps the floor plate secure. I originally thought the allen screw also kept the magazine internals in place, but fortunately it doesn’t which accommodates the use of Real Steel PMAG Ranger Plates.
Magpul PTS – PMAG Upper
There is a pin, just below the feeder mechanism. I believe that this pin is what is securing the magazines internals, but will confirm later (I cannot find my armorers punch of that pin size right now)
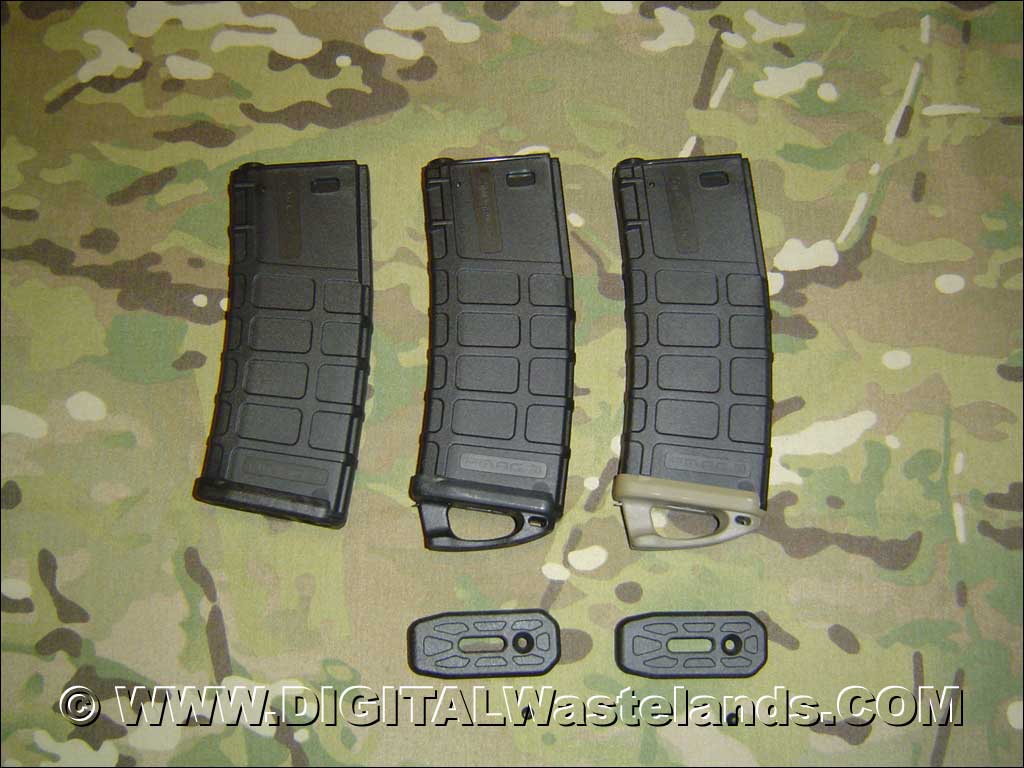
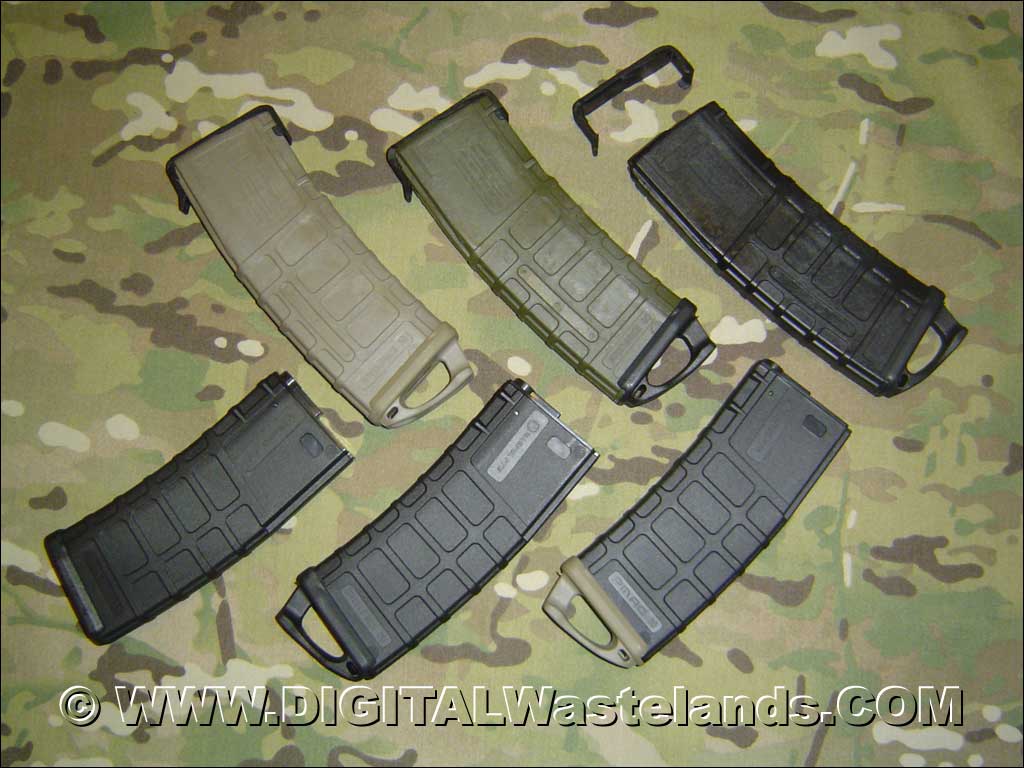
Top Magpul PMAGs. Bottom Magpul PTS PMAGs
You’ll notice, while the PTS PMAGs resemble the Real Steel PMAGs, side by side comparison shows differences in dimension, design and material used.
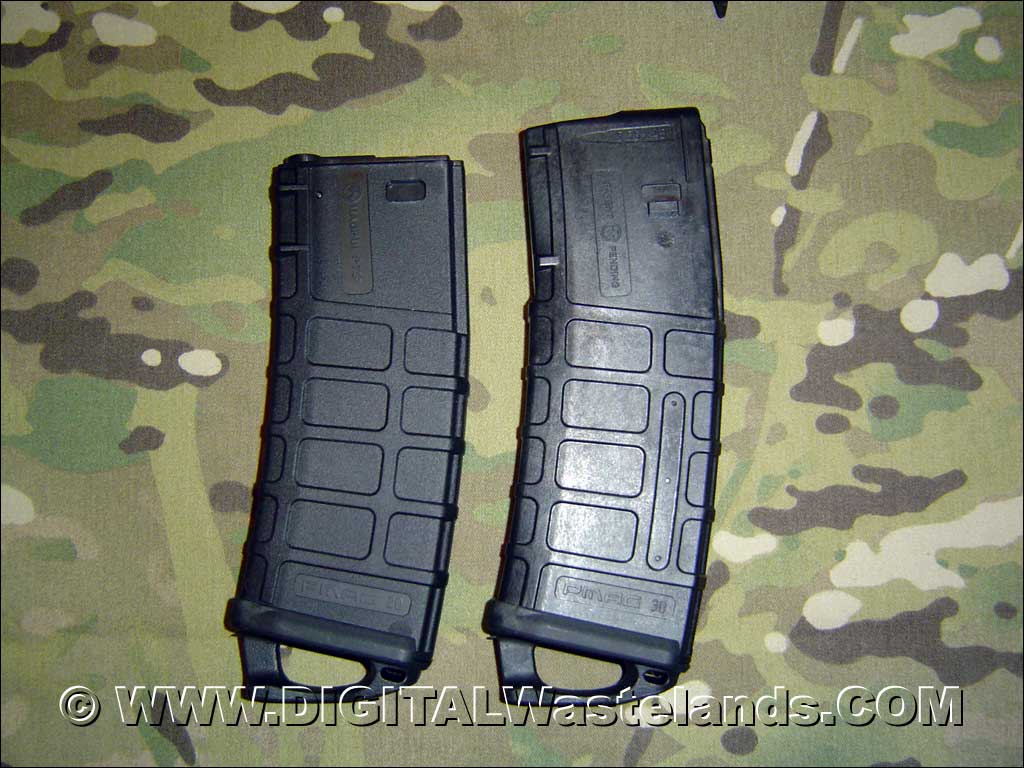
Magpul PMAG Comparison
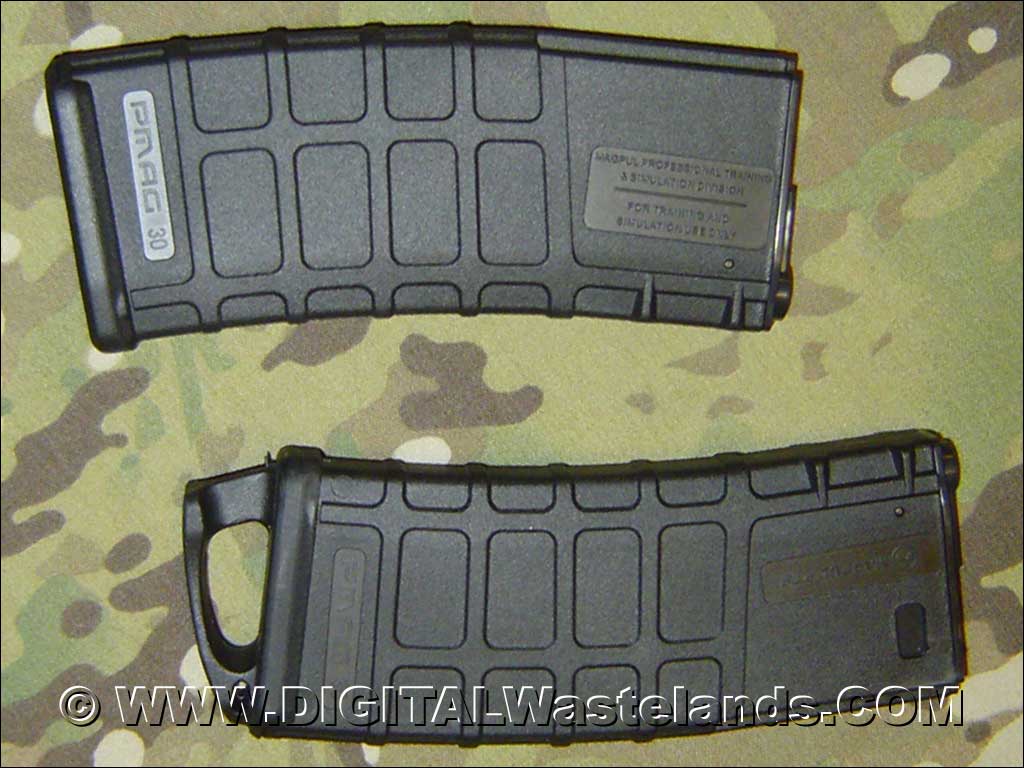
Magpul PMAG – Closeup of Trades
The build of the PTS PMAG is solid and as mentioned above, the PTS PMAGs use the real PMAG Ranger Plates. They are only held on by the spring loaded button when you replace the stock floor plate You do not need to use the allen screw.
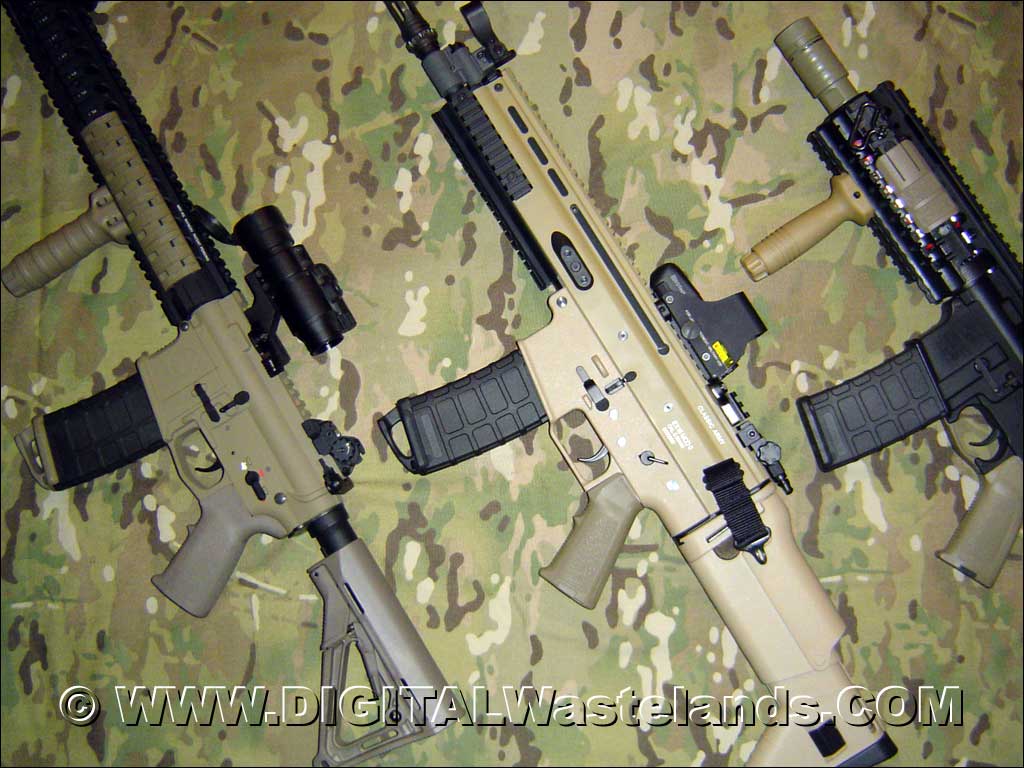
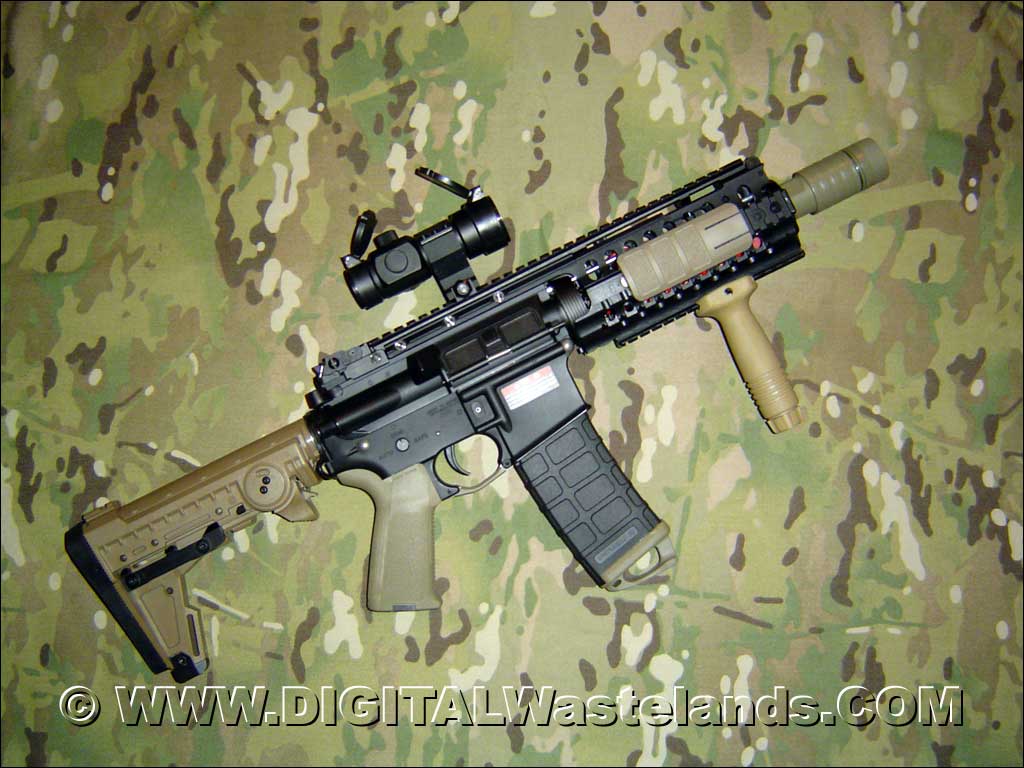
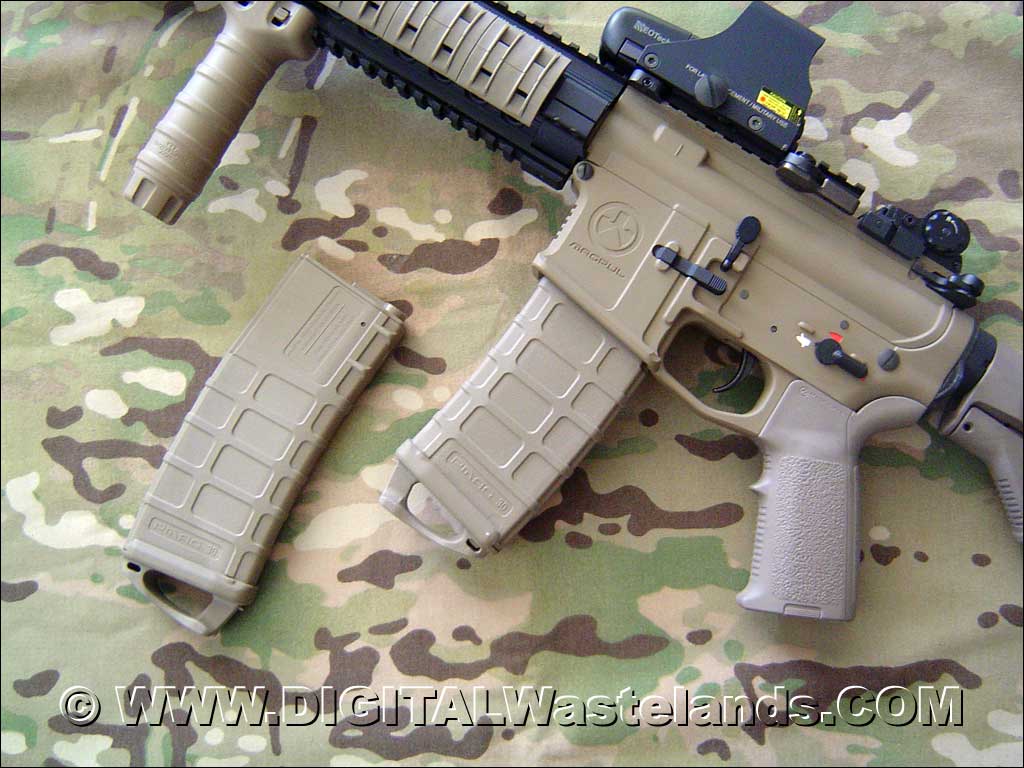
Magpul PMAG PTS on: Magpul M4, CA SCAR, TM M4 S-System
So far, I’ve test fitted and fired the PTS PMAGs on all my AEG’s that take STANAG type magazines and a few in shop at AEX. Feeding has been flawless for far, but will have more detailed test results after this weekend.
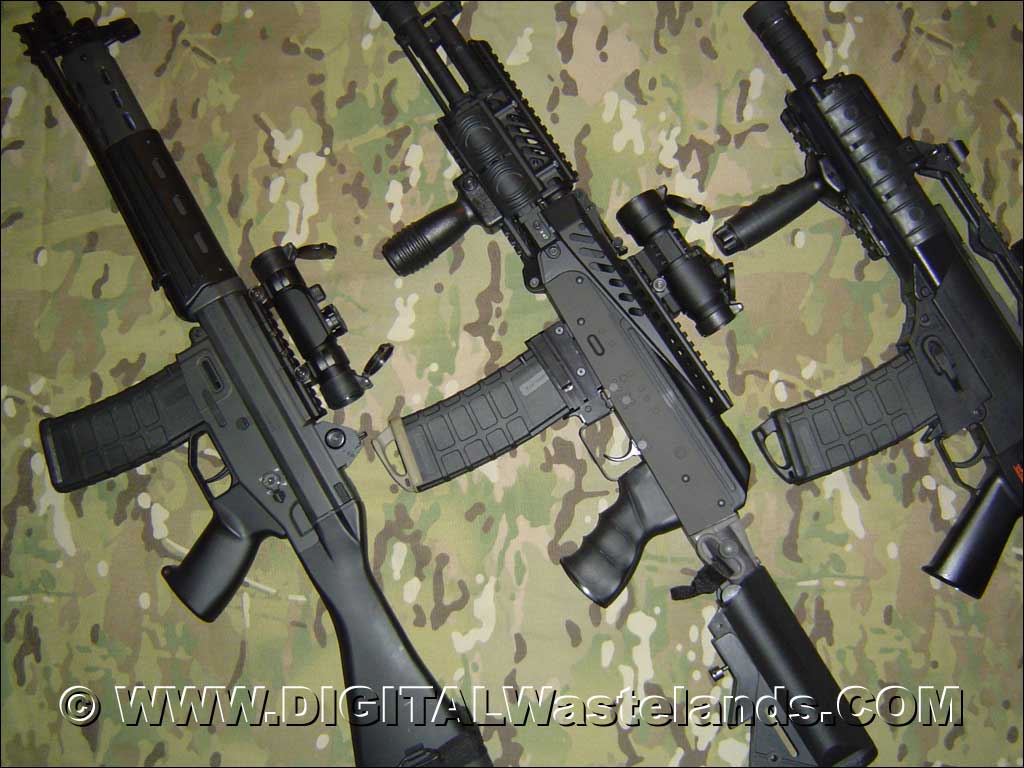
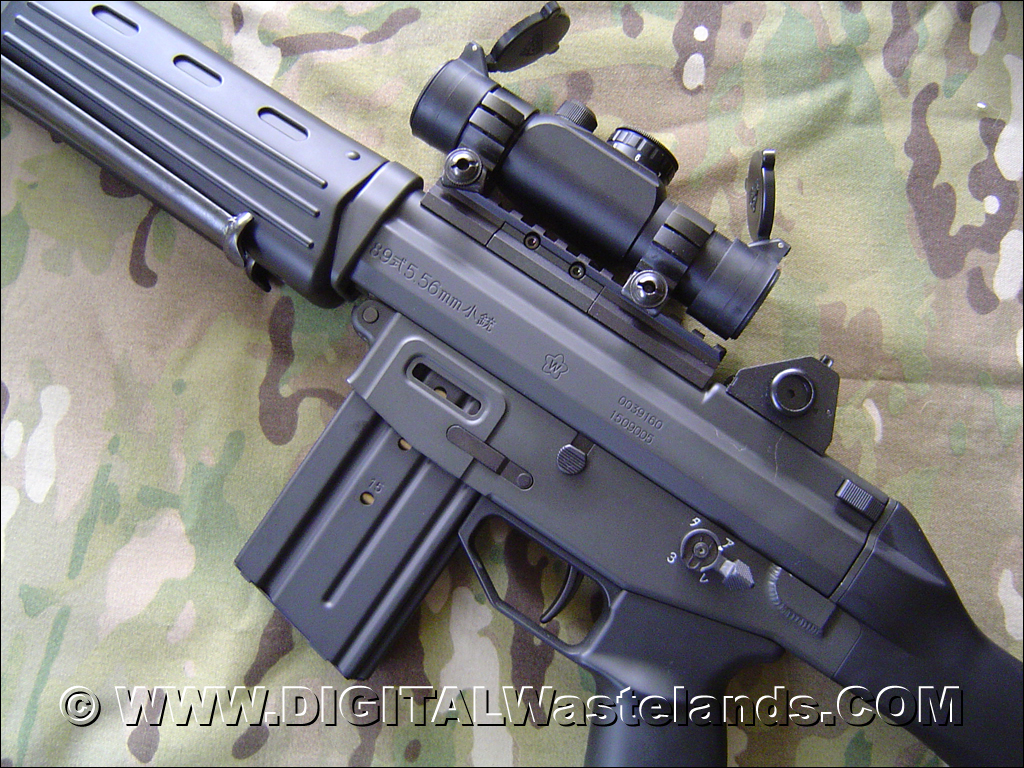
Magpul PMAG PTS on: TM Type 89, TSI Adapter, PPA Adapter
AEG
Fit
Feed
Notes
TM M4 with Magpul Body
Yes
Yes
Magazine has a little side to side play, but all magazines used in this specific body have that issue.
TM M4 S-System
Yes
Yes
Easy fit, no issues.
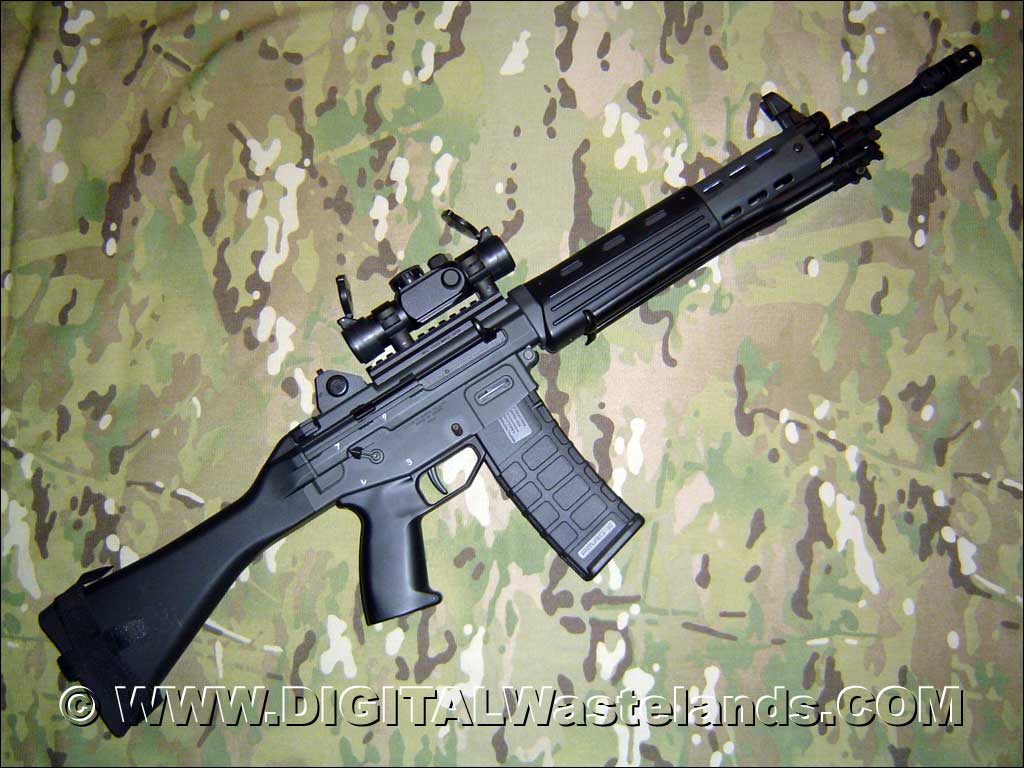
TM Type 89
Yes
Yes
Tight fit, but usual for any non Type 89 specific magazine.
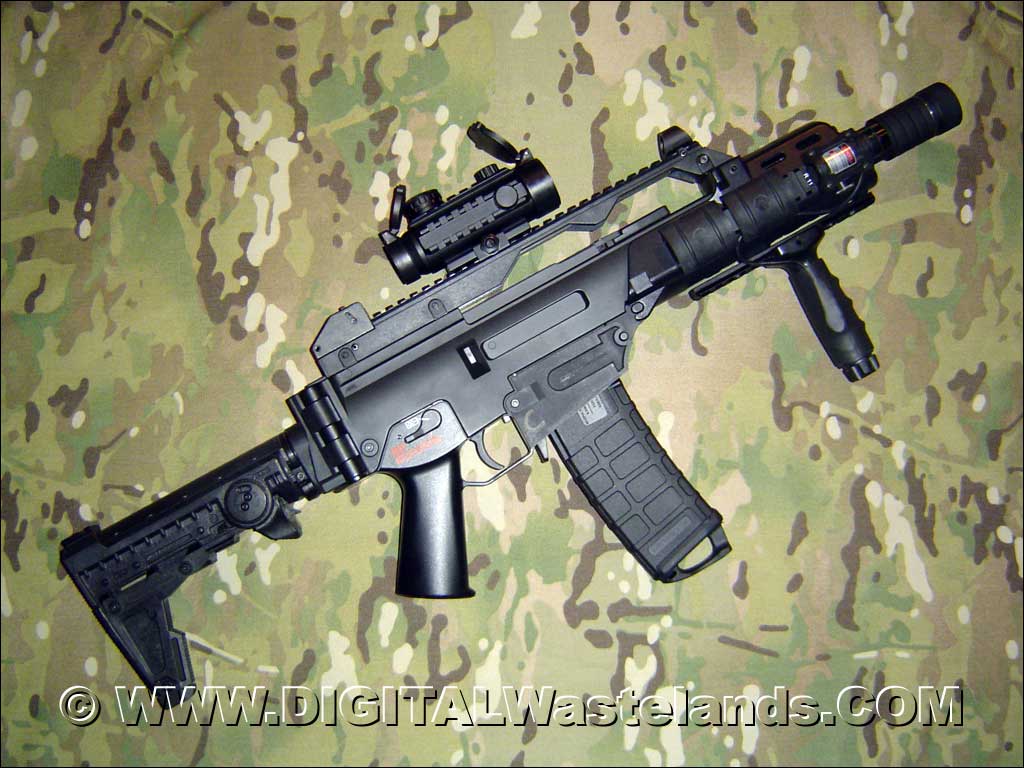
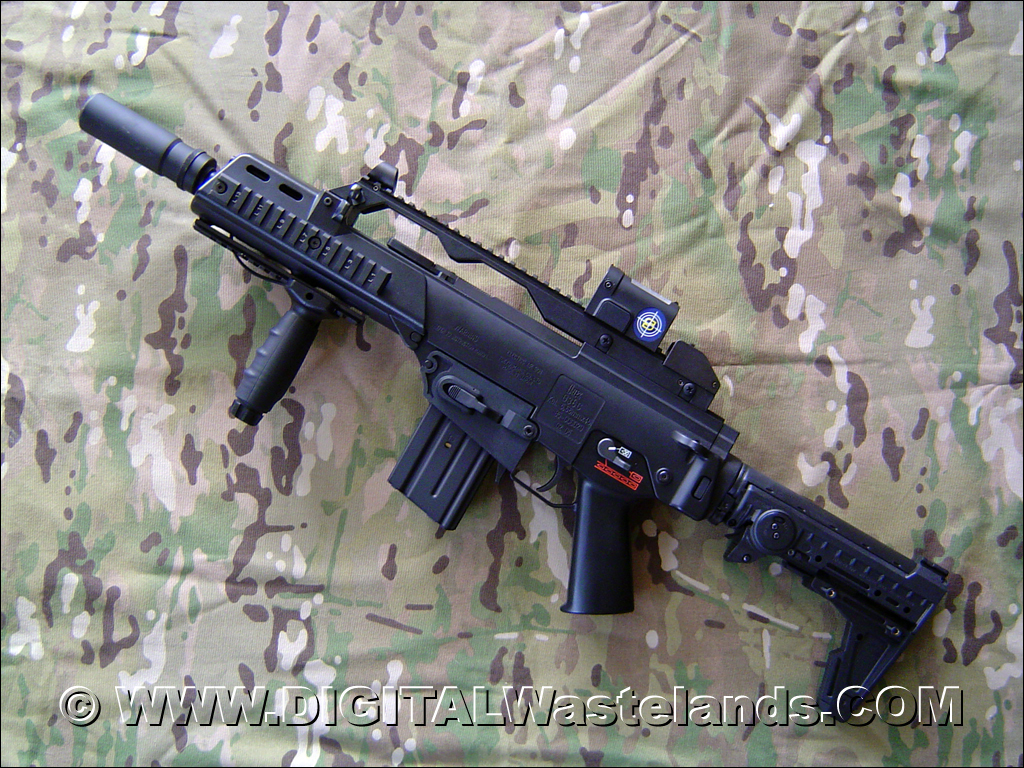
TM G36c w/PPA Adapter
Yes
Yes
Fit and worked perfectly in the PPA Magwell Adapter.
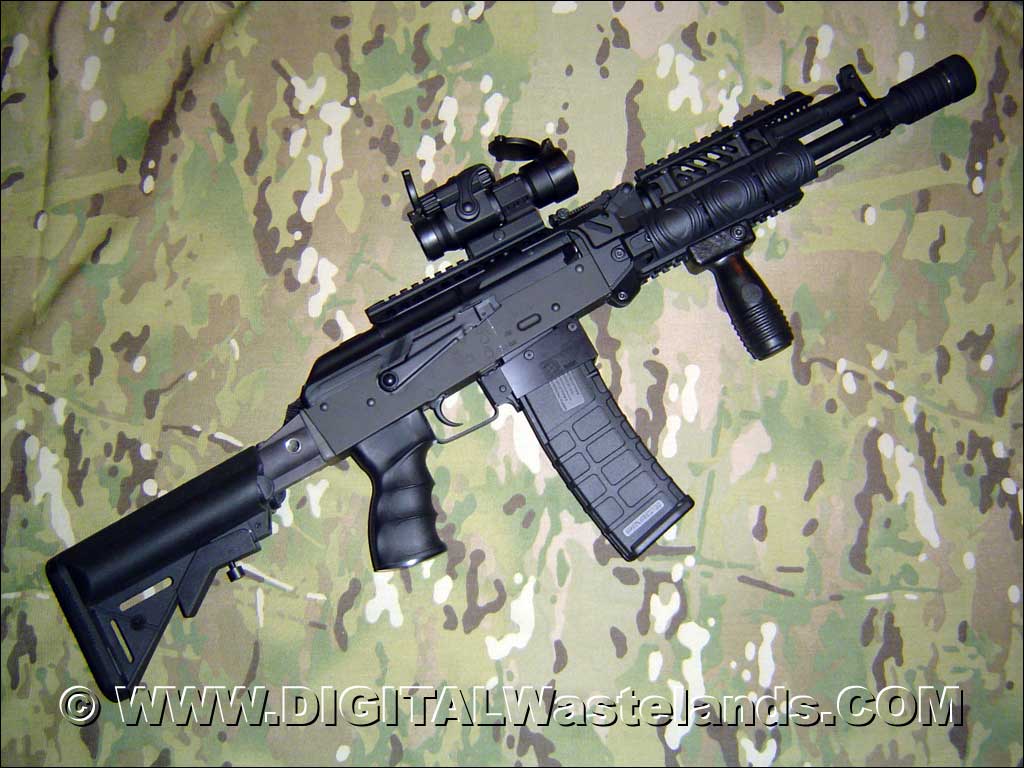
TM AK47 w/TSI adapter
No
No
This is a problem with the TSI Magwell Adapter.
CA SCAR-L
Yes
Yes
Easy fit, no issues.
CA M15’s (Older)
Yes
Yes
Magazines need a little shove to seat properly
VFC SCAR-L
Yes
Yes
Easy fit, no issues.
VFC 416
Yes
Yes
Easy fit, no issues.
Will add more models later as I can test them.
I’ve seen posts of people bitching about the $32.00 price. To put it in perspective, if a person were to get a Real Steel PMAG for $17.00 avg street price. Add a $22.00 midcap with removable internals. Plus the time it would take to try and modify the Real PMAG enough to accept the midcap internals. You would be at $39.00 just for parts alone.
Following are reference pics.
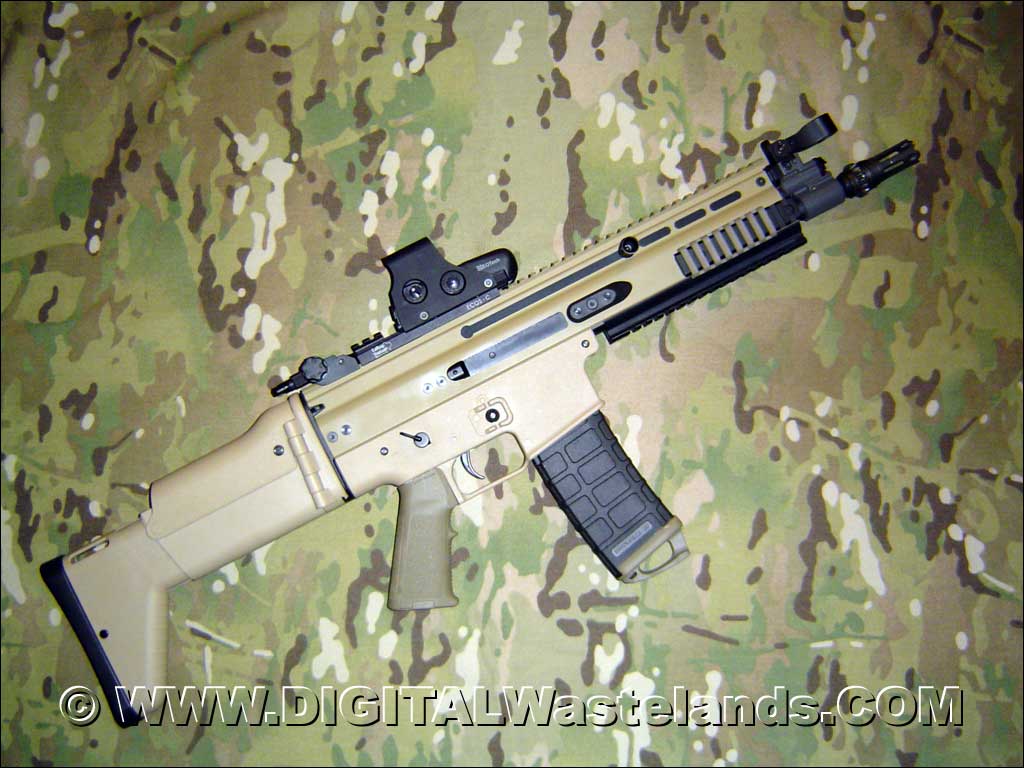
Magpul PMAG PTS on CA SCAR-L
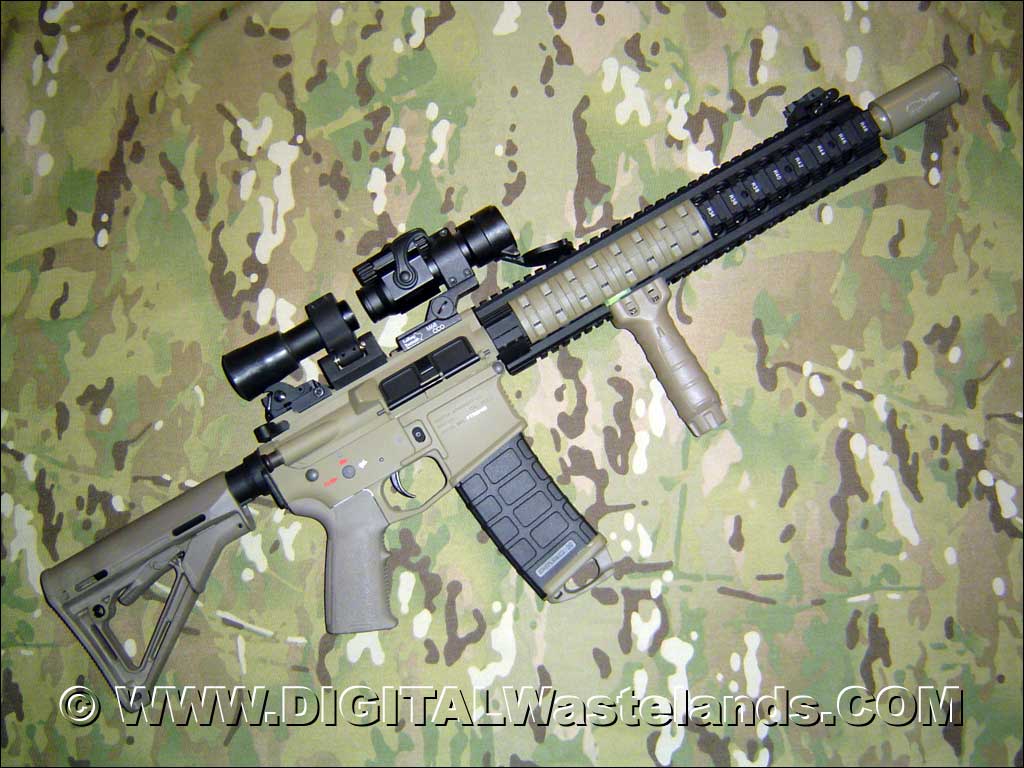
Magpul PMAG PTS on TM M4 Carbine w/Magpul Metal Body
Magpul PMAG PTS on TM M4 S-System
Magpul PMAG PTS on TM G36c with PPA Magwell Adapter
Magpul PMAG PTS on TM Type 89
Magpul PMAG PTS on TM AK47 with TSI Magwell Adapter
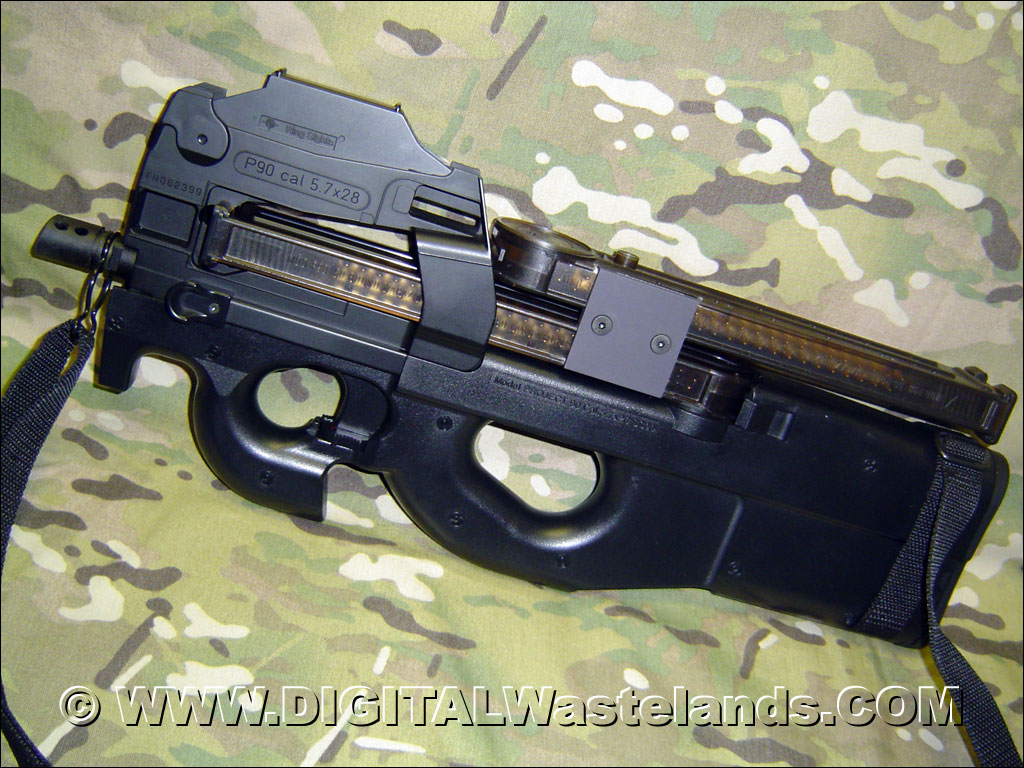
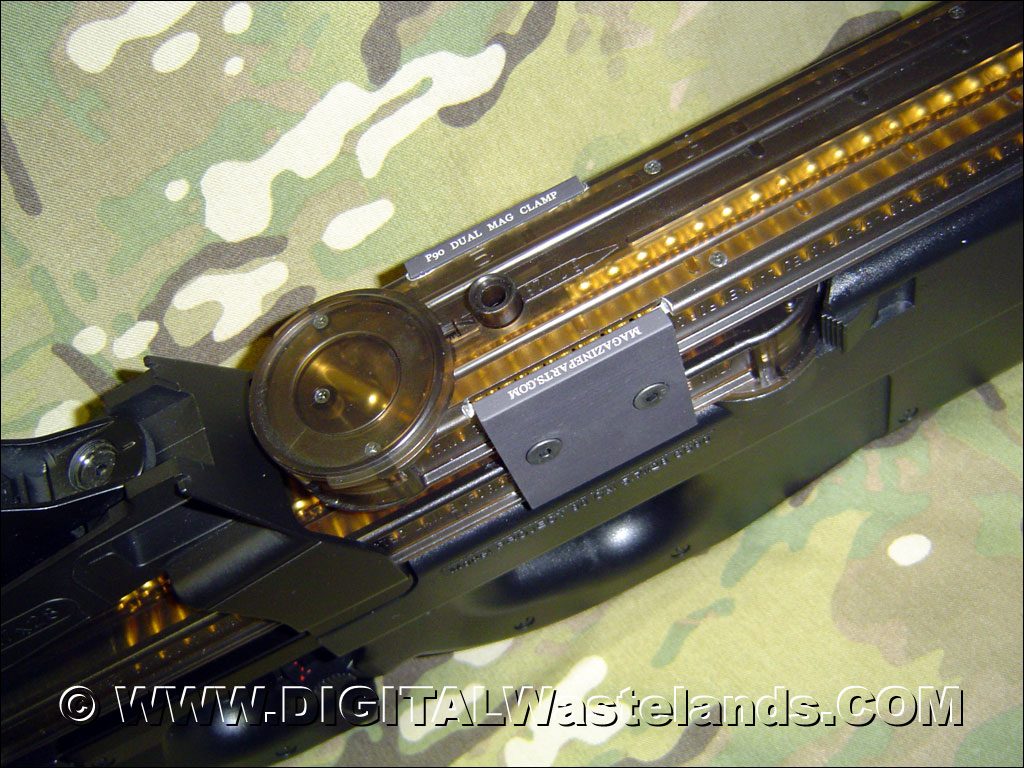
I saw this unique magazine clamp device in ARM’s Magazine, Nov 2007, in one of their Real Steel articles. I really liked the unique look of using this device and at $29.00, it was affordable.
Unfortunately I purchased this before I read my buddy Shinden’s (Poweredge Hawaii) post about the TM P90 magazines being taller then the Real Steel P90 magazine. So I needed to make notches in the TM P90 magazines. It’s not a task for a Dremel, but fortunately a drill press, and some patience did the trick.
This give a hint of what's incoming next 😉 This is the Tokyo Marui – Type89, 70 Round, Short Style magazine. It is designed like the original Type 89, 69 Round Magazine and has the new type of follower which feeds all bb's.? These feed flawlessly as with most TM lowcaps.
Tokyo Marui – Type 89 Short Style Magazine
Just like the original Type 89 Magazines, although they appear to be the same dimensions as other M4/M16 magazines, they only work in Type 89s and on G36's fitted with the PPA magazine adapter.
Tokyo Marui – Type 89 Short Style Magazine on TM G36c with PPA adapter
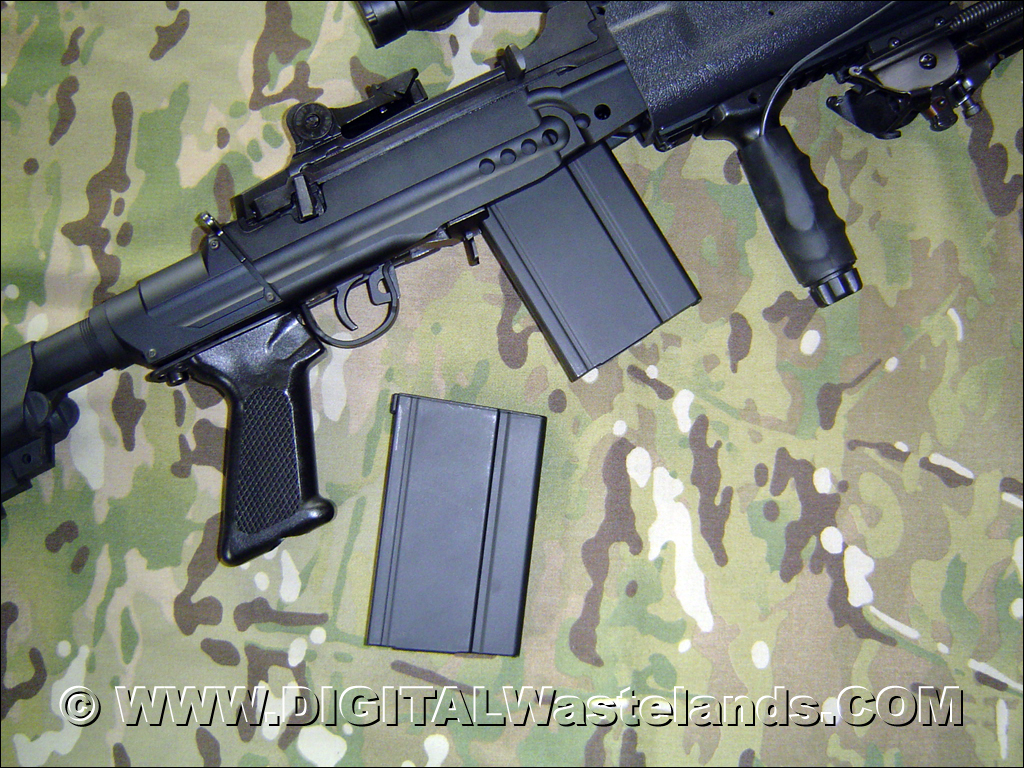
I placed another small order with RSOV for some miscellaneous parts recently. I noticed he had a 2 pack of A.C.M. (All China Made) M14 Magazines that cost about $14.00 U.S. Had to check them out at that price.
The are all plastic magazines. But a very thick solid plastic was used. The magazines fit perfectly into 2 of my TM M14's unlike some other midcaps that have recently released into the market (i.e. no filing needed for fitting onto a TM M14). They look similar in design to MAG M4 Midcaps in that they have an access door on the magazines bottom to access the spring and follower. Unfortunately these have a weak spring installed, possibly even weaker then G&P magazine springs. In full auto with a 9.6 battery you will get results like:
bb, bb, no bb, no bb, no bb, bb, bb, bb, no bb, no bb, no bb, etc…
And it will not feed the entire magazine. Already tried the silicon oil trick, but same problem It's a little better with the slower ROF of an 8.4, but it will still miss. At this time i cannot recommend these as a viable alternative to M14 magazine. Will keep working on them though and update if I can achieve any better results.
{simplegrade:4} Manufacturer:Classic Army (Hong Kong)
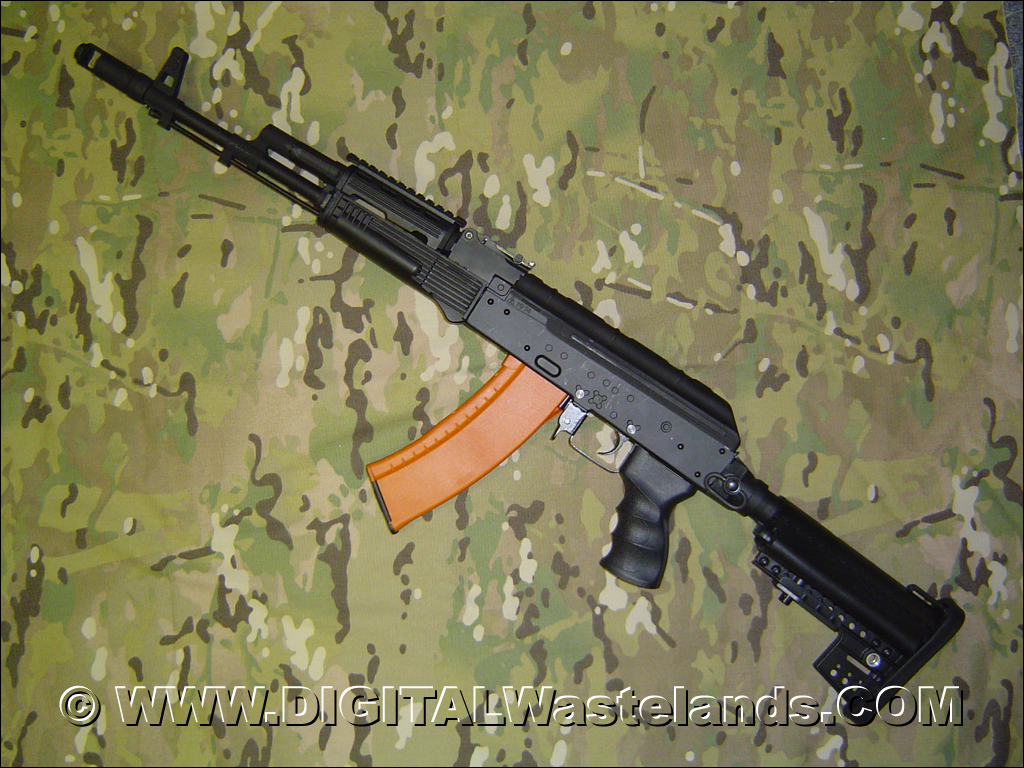
Classic Army – AK74 Bakelite 74 Round Magazine
MUCH better magazine build the G&P Bakelite magazine. While more orange in appearence, build wise it feeds and fits in magwell correctly. It is a mostly plastic build.
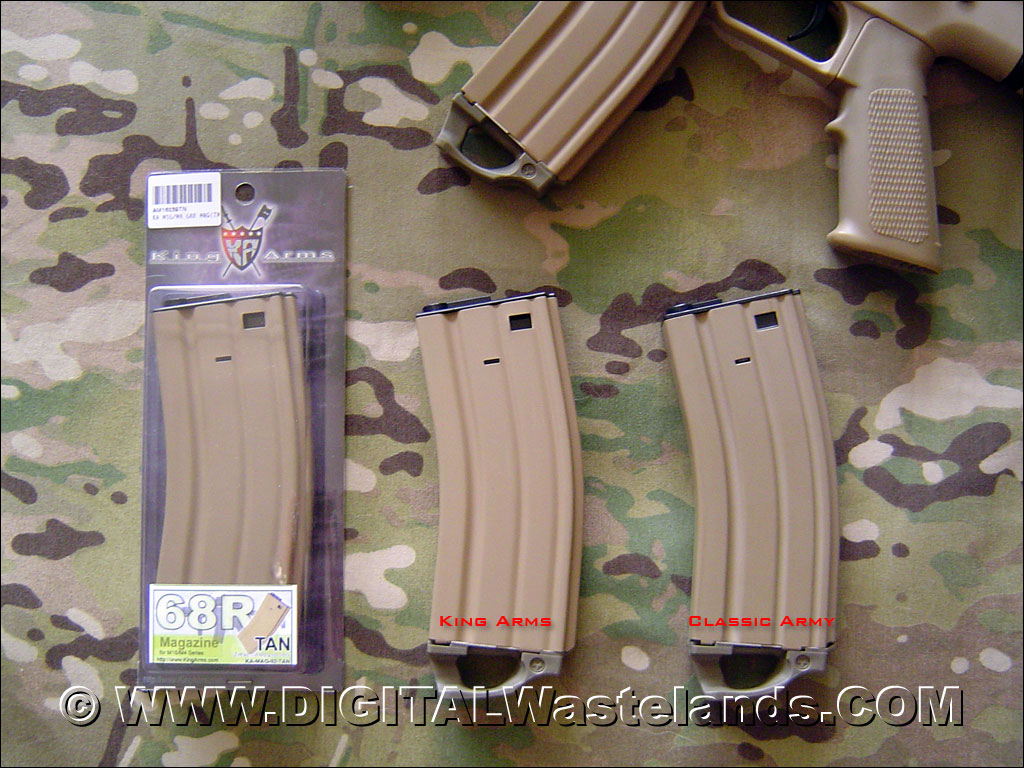
{simplegrade:3} Manufacturer:King Arms ( Hong Kong)
King Arms – 68 Round Magazines, Metal. Tan. Close color match to the CA SCAR's Tan on right.
I got the King Arms – 68 Round Magazines, for the reason the color closely matches the CA SCAR's magazine. I was pleasantly surprised these are metal and have adequately strong springs and long followers. There is a fitting problem on the CA SCAR though. The upper part of the magazine catch hole needs to be filed slightly for it to stay in place. These magazines also had a fitting issue in my G36 with PPA Magazine Adapter. But fit snugly in my M4 S-System, M4 R.I.S., Type 89, etc.
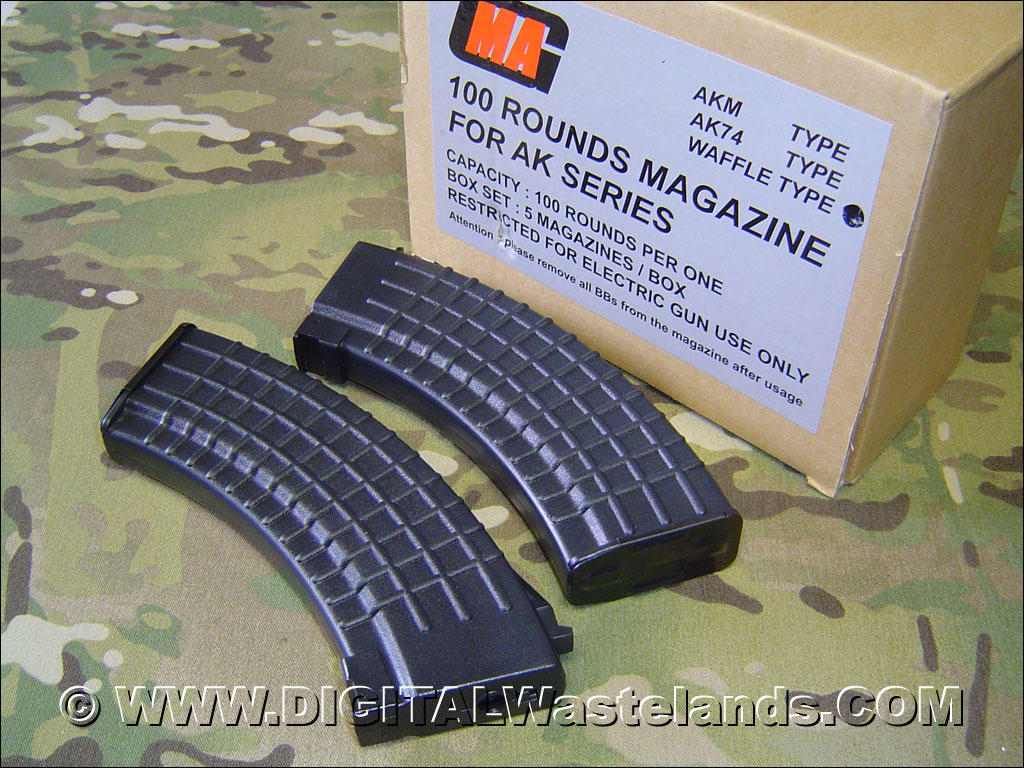
Pulled these in for my AK SOPMOD build. These come in a set of 5 and are 100 round capacity per magazine. Typical MAG strong springs insure smooth proper bb feeding. While these are mostly plastic in build, they are about 3/4 the weight of a TM Steel AK Lowcap.